Your Pool Base: 5 Helpful Measures
This article reveals 5 solutions for above-ground pools, which also apply to steel wall pools. If you want to sink a steel wall pool, then read our separate guide "Digging in a Steel Wall Pool - Pros & Cons + Instructions"
Step One: Choosing a location and planning
Ideally, you should find a spot in the garden which gets as much sun as possible. The sun is a great source of energy and your pool water will be warmer if it is not in the shade. Also, remember to think about your neighbours. Do you want your pool equipment very close to the pool? Will you have noisy devices like a strong sand filter system or a heat pump? The location will affect how much your neighbour notices. Even the way your pool is oriented can have an impact. If the pool is between the sand filter and your neighbour they will hear it less. If you have small children, make sure you're able to keep a good eye on them. It is also ideal if the ground is already as level as possible to avoid having to dig out large amounts of soil.
Why the ground should be level and firm
The ground will have a big impact on your pool.
- You can't trick water. If the ground underneath your pool isn't even, the water level will differ from one side to the other, spoiling the appearance.
- If your swimming pool is not straight, the strain placed on the supports or the pool liner is not evenly distributed. Poles can bend and your pool might even be permanently damaged.
Scenario 1: Can I place my pool directly on the lawn?
Setting up above-ground pools such as frame pools and air ring pools
Often, an above-ground pool is simply placed on the lawn. Provided that the ground itself is level and the slope is not more than 1%, this approach is quite feasible. However, this will cause damage to the lawn - you will have a large brown spot in the garden when you take the pool down again. A more problematic issue is if your lawn moulders. However, this does not have to happen and we have never received feedback that there have been any bad odours. Still, start by removing any objects from the area. For example:
- Stones
- Branches
- Roots
- Heaps of earth
Now, as a minimum, put down a groundsheet. This will protect the pool liner from root growth and any small stones you may have missed as well as preventing contact with any rotting material.

Scenario 2: Removing the turf
Suitable for above-ground pools and steel wall pools
A better solution for the pool base that still doesn't require too much work would be to remove the turf. Since the grass would die off anyway, we can't see any disadvantages to this. Start by marking the area of turf you want to remove.
How-to for a rectangular pool:
Determine the space required. The amount of space needed is often greater than the size of the actual pool because supports protrude on the sides. For example, the Intex Ultra Quadra XTR 549 x 274 x 132 cm frame pool requires a total of 605 x 330 cm of space. Decide whether you want to remove the turf from the whole area or only where the supports are. In any case, the supports must be at the same height as the pool. It is best to place small blocks of stone under them, as there will be considerable pressure on the supports. You can start by just setting up the pool frame to find out where the supports will be later. This will help you mark the area to be worked on. If you do not want to set up the pool frame in advance, measure the area. You can mark the area with flour or with string attached to stakes driven into the ground
How-to for a round pool:
Hit a small stake into the ground and attach a piece of string to it that is as long as the radius of the pool. Hold onto the end of the string and walk in a circle, marking it as you go. Flour works well here.
Creating the pool base: remove the turf and fill the area with sand
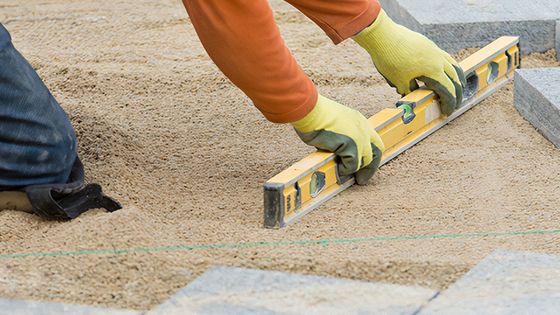
You've already marked the area that needs to be dug out. Now use a spade to remove the turf. Two to six centimetres are definitely enough. Use a straightedge (1.5 meters or longer is ideal) and put a spirit level on it. Now check whether it is uneven anywhere. If so, level out any unevenness. If the soil is very firm, you can then lay a groundsheet or pool mats. You can also add sand to raise the entire level again. But at the latest when using sand or if your soil is not very firm, you will need to use a vibrating plate to compact the soil. Otherwise, your pool could sink into the ground at certain points, leading to one-sided loads, which can and probably will lead to permanent damage to the pool.
Scenario 3: Leveling the ground
The site is often not even but has depressions or even an overall slope.
3a) Leveling of unevenness
If the substrate is a lawn, as in scenario 1, then fill in the unevenness with sand. Make sure you apply the sand as densely as possible. However, this does not work at the points where the supports of a frame pool are braced. The high pressure at the support ends means that they will sink in if the sand is not highly compacted. You can build the pool frame without a liner and see if you can orient it so that supports are not placed on areas that are "just" backfilled.
3b) Leveling the ground by removing material
Particularly when it comes to slopes, the most thorough and reliable long-term solution is to level the entire surface by removing material. In principle, you proceed as in scenario 2. You can remove up to about 18 centimetres without needing concrete work. For the vast majority of situations, this is quite sufficient. Remove the soil, using a straightedge and spirit level to check that the ground is as level as possible. We then recommend applying a layer of sand and then compacting it. If the earth is already firm, you can use a vibratory plate with 10-11 kN. However, there is no harm in using a vibratory plate with 18 kN or more. The only argument against this is their weight.
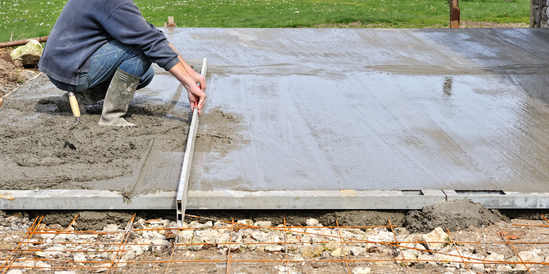
Scenario 4: Constructing a concrete slab
This is the best and most thorough solution when installing a swimming pool. A concrete slab creates a very durable and stable base for your pool. This type of slab is particularly suitable for a steel wall pool or a large frame pool because of the very high pressure exerted by the supports. Quick Up pools do not need a base like this because these pools exert uniform pressure. Remember that a concrete slab involves investing time and money. Think about whether this is worth it beforehand.
Constructing a concrete slab as a pool base: practical tips
- We recommend laying a 10-20 cm layer of gravel (or crushed stone) under the concrete slab so that you have drainage. Of course, this gravel layer needs to be strongly compacted using a vibratory plate, so that it withstands the pressure of the slab itself and the water pressure.
- For construction, be sure to use rods to reinforce the concrete, as this will make your slab much stronger and more durable. Tie the rods together so they don't slip when the concrete is poured
- The reinforcing rods should not be placed directly on the ground - there are spacers available to ensure that the rods "float" slightly raised above the ground.
- Don't get rid of all excavated material immediately - you sometimes need some of it to fill in gaps.
- Order a few per cent more concrete than you calculated - often you need a tiny bit more than you expect. There's nothing more frustrating than finding out you don't have quite enough!
- Remember to also take into account the space needed to prop up any protruding supports when sizing the concrete slab.
Choosing a protective layer for your pool: what are the differences between a groundsheet, fleece, and pool mats?
The important thing is to always protect your pool from overlooked small stones, loose material, roots, etc., to prevent your pool liner from getting damaged as far as possible. Various layers can serve this purpose:
- A groundsheet is the cheapest solution. These are very thin but do the job.
- Fleeces are often a little thicker and a little more comfortable to stand on - they are used as a standard pool base for steel wall pools. But there is no reason not to use fleece for above-ground pools too.
- Pool mats are between 4 to 12 mm thick and a little spongy. They are more comfortable to step on and make the ground seem less hard. Plus they have an insulating effect, allowing solar collectors and pool heating pumps in particular to operate more efficiently, as there is far less heat loss to the ground. Take a look at our guide "Heating Your Pool - Tips & Tricks" for more information.
- Thick Styrodur boards (also called XPS boards) provide even better insulation. They also cost no more than pool mats, but they require very extensive work if you have a pool with supports, because the Styrodur boards do not withstand high pressure exerted on a very small area. Only particularly hard Styrodur panels are suitable because they cope less well with this sort of pressure than pool mats or fleeces.
Scenario 5: Can you put a pool on the terrace?
Can you simply place your pool on the terrace? Well, this is possible in principle. Above-ground pools are often put on a terrace - particularly small frame pools. But remember that terraces are sloping, so that rainwater can drain away to the outside. So measure the slope - 1% slope is the maximum! And before you start putting up your pool, check whether your patio can withstand the weight. Terraces made of wood in particular can only cope with a limited load. This is something you need to research.
Related products
-
Free delivery in Great Britain
from £99.90 -
Free
returns -
We operate in a
climate-conscious manner. Secure payments
with SLL encryption technology